Hosted DNS web filter for MSPs: one filter account for each of your clients
If you look after IT for several libraries, schools or small offices, you can run our managed DNS filter for all of them. Each client gets its own account with its own networks, rules, staff PINs, block page, reports and dashboard logins. We create the accounts for you.
Who this guide is for
IT providers who want to offer web filtering as a service without running resolvers, appliances or agents. It fits best where clients need clear category rules, a simple staff bypass and a monthly record, more than deep traffic inspection.
If you build your own filtering product and need the category data itself, our MSP web filtering page covers licensing the database instead.
Library and school IT providers
Clients that must show a filter is in place and need a simple adult research bypass.
Small business MSPs
Offices that want adult, gambling or bypass sites closed on staff and guest Wi-Fi.
Community organization IT
Youth centres, churches and charities with shared public Wi-Fi.
One-person IT shops
Technicians who need a filter that clients' staff can mostly run themselves.
Two levels: client account and network
The filter keeps clients strictly apart. Everything a client configures lives inside its own account, and each account splits further into networks for sites or Wi-Fi.
Your logins
- One dashboard login per client account
- Created by us on request
- Each login opens only its own client
- Extra logins for client staff on request
Client account
- Profiles and blocked categories
- Always allowed and blocked lists
- Branded block page
- Time zone and report recipients
- Client's own dashboard logins
Network
- A branch, a building or a Wi-Fi
- Its registered addresses
- Its own encrypted DNS link
- Its own staff page and PIN
- Its own lists and report line
The Overview page of each client
- Lookups and blocks for that client, with a recent trend
- Five readiness checks, such as whether the filter answered the client's network in the last 24 hours
- Blocks by category, so unusual activity stands out
- The place to start every check-in with that client
Working inside a client
- The same pages the client sees: Overview, Policy, Activity, Networks, Staff bypass, Reports, Import lists, Settings
- Changes apply to that client only, within seconds
- To work on another client, sign in with that client's login
Client logins see only their own account. They cannot see any other client, and every page they open is limited to their account's networks and settings. There is no shared partner view today. Tell us if you want one login for all your clients.
Onboarding a new client, step by step
Most onboardings follow the same eight steps. Plan about an hour for a single-site client, most of it agreeing the policy. Multi-site clients take longer mainly because each site's address has to be registered from that site, or by an administrator who knows it.
Ask us for the account
Send the client's name. The new account starts with a Main network and the CIPA standard preset.
Agree the policy
Go through the client's written policy and choose categories, SafeSearch and YouTube settings for each group of users.
Build profiles and networks
Create profiles from presets and one network per site or Wi-Fi. See profiles and networks.
Register addresses
Open each network page from the client site and add its public address. The filter only answers registered addresses.
Import old lists
Upload the client's allow and block lists from its previous filter, with a preview first. See importing lists.
Brand the block page
Add the client's name, logo, message and the support contact you want users to call.
Point the router
Set the client's router or firewall to hand out the filter as the only DNS server, and lock down outside DNS.
Hand over
Give the client its staff links and PINs, ask us for a client staff login if wanted, and add the director to the monthly report email.
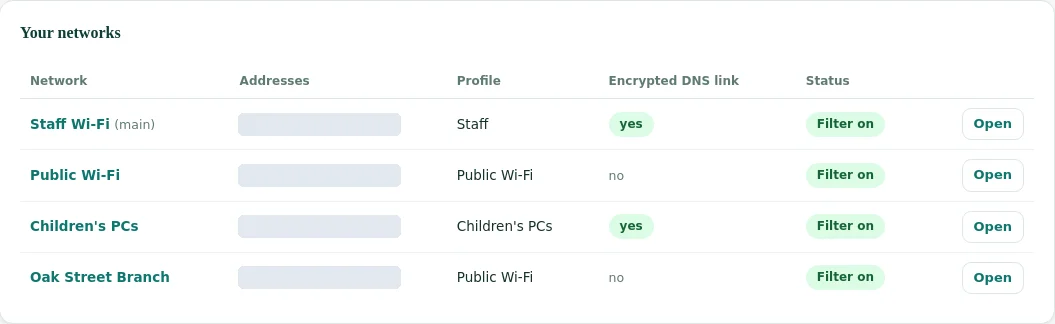
What stays separate per client
Separation is the point of running clients as accounts. This table shows where each setting lives, so you know what a change in one place can affect.
| Setting | Lives on | Effect of a change |
|---|---|---|
| Blocked categories, SafeSearch, YouTube | Profile, inside one client | All networks of that client using the profile |
| Time schedules | Profile, inside one client | Same as above, in that client's time zone |
| Always allowed and blocked lists | Client account, or one network | That client, or that one network |
| Staff page and PIN | Network | That network only |
| Encrypted DNS link | Network | Devices set up with that link |
| Block page branding | Client account | All of that client's networks |
| Report recipients and time zone | Client account | That client's monthly email and schedules |
| Dashboard logins | Client account | People who can see and change that client only |
Each client also has its own time zone, so a client in another state gets schedules and month boundaries in its own local time.
Nothing is shared between clients. A list or a profile you build for one client has to be built again for another, which also means one client's change can never leak into another's network.
Daily operations across clients
Once clients are live, most of the work is answering small requests. These are the ones MSPs handle most, and where to do them.
"This site is blocked by mistake"
Sign in to that client, search the site in Activity to see the reason, then add it to always allowed for the client or one network.
"Staff need adult research now"
The client's staff use their own staff page and PIN. You can also start or stop a bypass from the client's Staff bypass page.
"The filter stopped working"
Open that client's Overview page. A failed readiness check for the last 24 hours usually means a changed public address or a router change.
"A staff member left"
Change the PIN on the affected network, and create a new staff link if the old one was widely shared.
"We opened a new branch"
Add a network inside the client, register the branch address and give the branch its staff link.
"The board wants numbers"
Open the client's monthly report, or add the board contact to the monthly email under the client's Settings.
Reports per client
Each client account produces its own reports. You never have to cut a shared report apart before sending it to a client.
What each client gets
- A monthly activity report for all networks and for each network
- Lookups, blocks, block rate and staff bypass uses
- Blocks by category and the most blocked websites
- A table of every staff bypass with time, network and source
- CSV files and a printable page, plus an optional email on the first of the month
How MSPs use them
- Add your support address next to the client's director as a recipient
- Use the by-network table in quarterly reviews
- Spot wrong blocks from the most blocked websites list
- Show that the research bypass is used, and used sparingly
- Keep the CSV files in the client's documentation folder
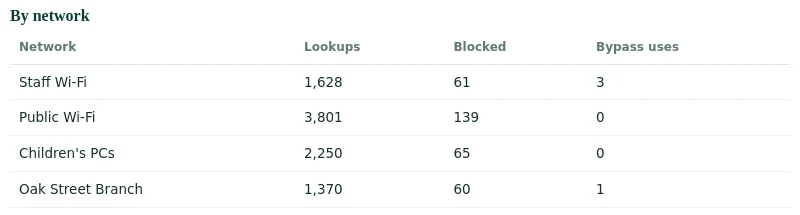
Details of every section are in the monthly filtering reports guide.
Who does what: you, the client and us
A clear split of roles keeps support calls short. This is a split that works well; adjust it in your own client agreements.
| Task | MSP | Client staff | Us |
|---|---|---|---|
| Create client accounts | Requests | Creates | |
| Policy, profiles, schedules | Sets up and changes | Agrees the policy | Advises on request |
| Router and device settings | Configures | Provides the steps | |
| Adult research bypass | Rotates PINs | Uses the staff page | |
| Wrongly blocked sites | Adds to always allowed | Reports them | Reviews category labels you send us |
| Monthly reports | Reviews, adds recipients | Receives | Sends the email |
| Running the filter service | Operates resolvers and dashboard |
Start with one pilot client
The fastest way to judge the service is one real client with one or two sites. A pilot shows how your team and the client's staff get on with the dashboard before you plan a wider rollout.
Pick a friendly client
A client with a fixed public address, a known policy and staff who will tell you what they notice.
Run it alongside first
Point one test device at the new filter with its encrypted link while the old filter keeps running for everyone else.
Switch one network
Move one network's router to the filter during a quiet hour and watch Activity for the first day.
Collect the requests
Note every unblock request and bypass question in the first two weeks. They show where the policy needs tuning.
Read the first report
The first monthly report gives you numbers to discuss with the client and a template for your other clients.
Write your runbook
Turn what you learned into a short onboarding checklist for the next client.
Material to hand each client
A one-page handover per client prevents most early calls. Keep it short and keep the PIN off anything that patrons or students can see.
For the client's staff
- The staff page link for each network, to bookmark
- The PIN, handed over in person or by a private channel
- What the bypass opens and what it does not
- That secure sites show a browser warning when blocked
- Who to contact for a wrongly blocked site
For the client's director
- Which categories are blocked on which network
- The printable policy record from the Reports page
- When the monthly report email arrives and who gets it
- A dashboard login of their own, which we create on request
- Your support contact and hours
Network setup at client sites
The filter works at the DNS level, so the setup is the same at every client: send DNS to the filter, keep other DNS out.
At the router or firewall
- Hand out the filter as the only DNS server by DHCP
- Allow outgoing DNS only to the filter
- Block DNS over TLS to other servers
- Register the site's public address on its network page
On managed devices
- Turn off the browsers' own encrypted DNS by policy
- Use the network's encrypted DNS link on laptops that travel
- Keep public PCs locked so VPN apps cannot be installed
- Test once from each network after any change
The filter adds its own protections: unknown addresses are refused, public encrypted DNS services and VPN sites are blocked, and browsers are told to switch off automatic encrypted DNS. Background: encrypted DNS and web filtering.
Limits to plan for
Know these before you put the service in a client contract. They come from DNS filtering itself or from how the service works today.
Writing them into your service description up front saves awkward conversations later, and helps clients choose the right extra layers, such as device management or a separate security service.
Domain level only
DNS filtering never sees full URLs, so rules apply to whole websites, not single pages or videos.
HTTPS warnings
Blocked secure sites show a browser certificate warning before any block page. Tell clients' staff to expect it.
Addresses must be registered
A client whose provider changes its public address is refused until the new address is added. Fixed addresses make life easier.
No per-person rules
Rules apply per network. Staff and guests on one shared address need separate addresses or encrypted links to get different rules.
No security feed
The filter blocks by content category. It is not a malware or phishing protection service; keep your security stack for that.
No monitoring
It records website lookups per network. It does not watch messages, keystrokes or behaviour.
Hosted filter or your own build
Some MSPs run their own resolvers and buy category data; others want a finished service. Both are possible with us. This comparison helps you choose per client base.
| Question | Hosted filter (this page) | Your own build with our data |
|---|---|---|
| What you run | Nothing but client routers | Resolvers, policy engine, dashboard |
| Client dashboard | Included, with staff bypass, reports and branding | You build or buy one |
| Category data | Built in and kept current by us | Licensed files and lookup API |
| Best for | Libraries, schools and small offices with simple needs | MSPs with their own security platform and engineers |
| Where to read more | The guides linked on this page | MSP web filtering and the web filtering database |
MSP questions
Can our clients log in to see their own filter?
Yes. Each client can have its own login that sees only that client's account. It never sees other clients.
Do we need to install anything at client sites?
No appliance and no agent. Point the router at the filter and register the public address. Single devices can use an encrypted DNS link.
Does each client site get its own staff PIN?
Yes. Every network has its own staff page and PIN, and a bypass applies to that network only.
Can the block page show the client's name instead of ours?
Yes. It is branded per client account with the client's name, logo, message and contacts.
How do client reports work?
Each client account has its own monthly report per network and for all networks, as a page and CSV, with an optional email to up to 10 addresses.
How are new client accounts created?
We create them with you. A new account starts with a Main network and the CIPA standard preset.
Can we copy one client's policy to another?
Not with one click. Use the presets as a common starting point, then copy a client's lists from its Policy page into a text file and import that file into the next client.
Can we give a client's own IT person access?
Yes. Ask us and we add a login for anyone the client names. It sees and changes only that client's account, so you can share day-to-day list edits with them.
What happens if a client leaves us?
Tell us and we will close the account at the date you agree with the client. Point the client's routers to their new DNS before that date, and download any reports the client wants to keep.
Do client networks share an IP address with others?
No sharing is needed on your side. Each client site registers its own public address, and the filter refuses addresses that are not registered to any client.
How is the service priced for MSPs?
We quote per deployment, based on the number of clients and sites. Tell us your client mix and we will come back with a proposal.
Bring your first client
Tell us how many clients and sites you look after and what they use today. We will set up your first client account with you and walk through the dashboard.
More guides: staff bypass PIN · branded block page · time schedules · DNS filtering for business
YouTube is a trademark of Google LLC. It is used here only to identify the service discussed. Web Filtering Database is not affiliated with, sponsored or endorsed by its owner.